Categories
News Take better photos

2018 prize winner explains how he made his stunning image

Chris Cherrington, our top prize winner for 2018, explains how he made his stunning image of Gloucester Cathedral cloisters.

Gloucester Cathedral cloisters
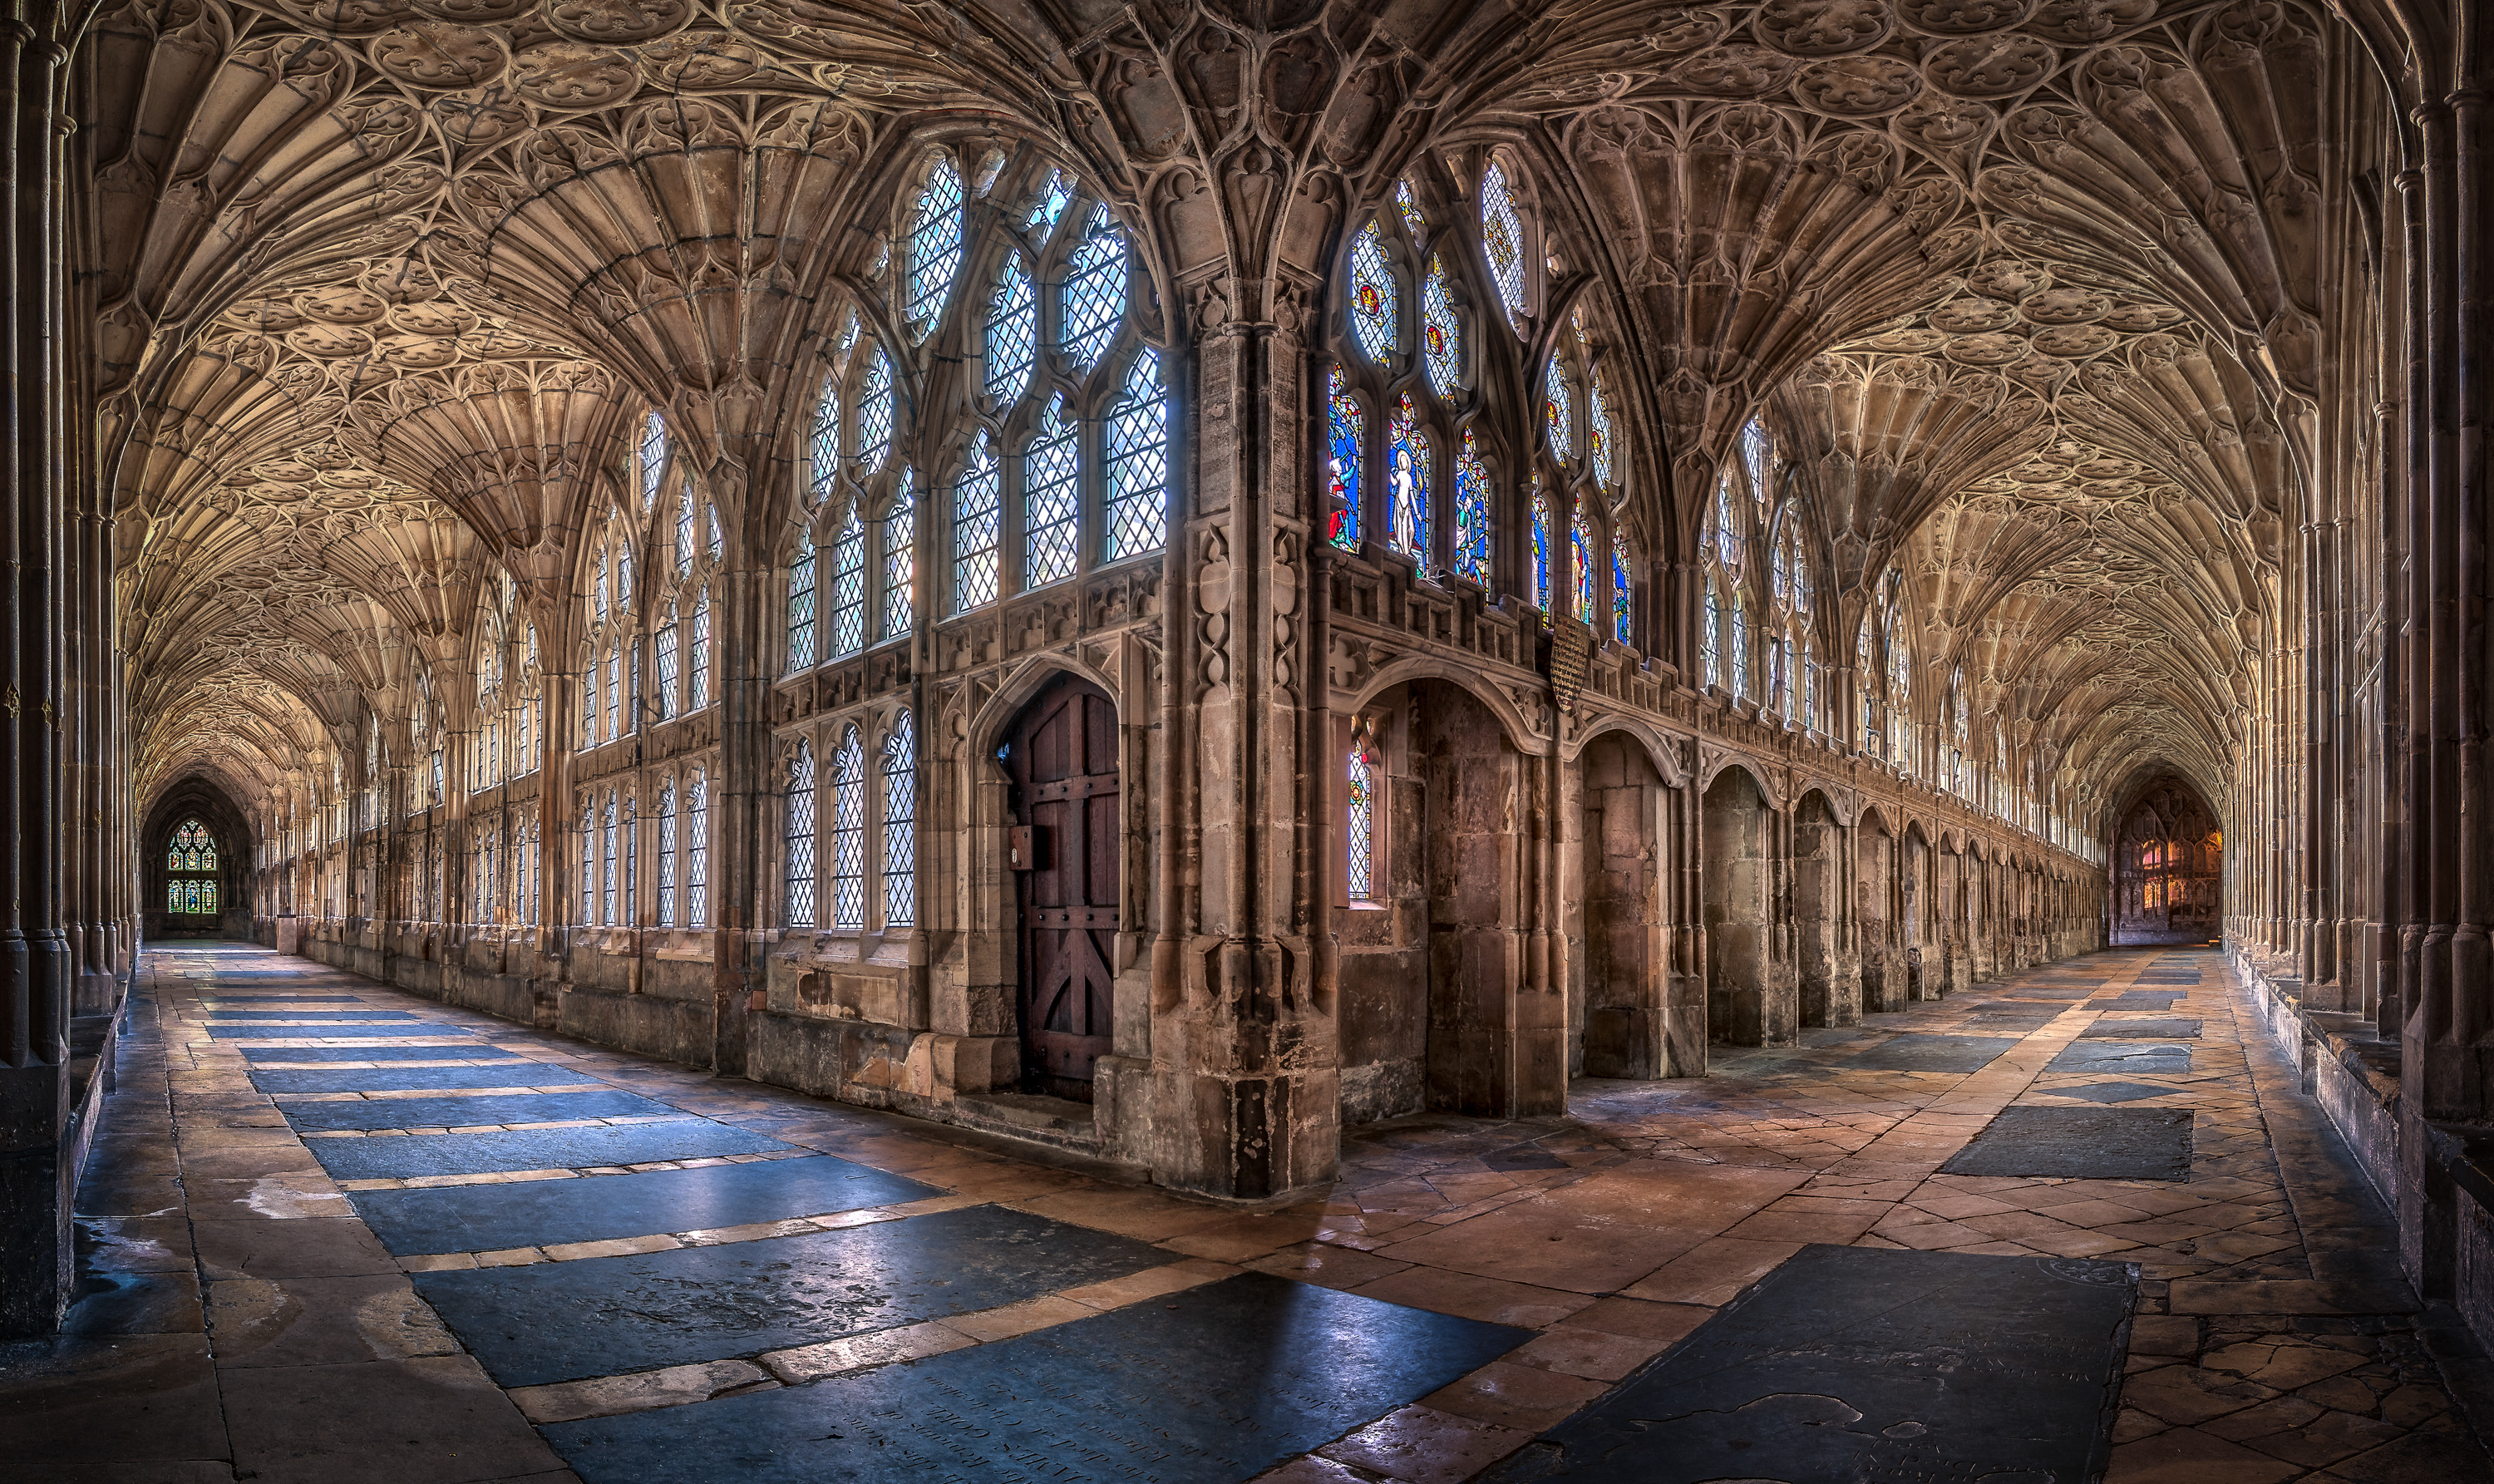
Gloucester Cathedral cloisters by Christopher JT Cherrington, Wikimedia Commons CC BY-SA 4.0

For higher resolutions, see the image page on Wikimedia Commons.

The image

My final image was a stitched panorama consisting of 4 angles, derived from a total of 26 original exposures.

In each of the 4 directions, I bracketed between 5 and 7 shots between -3EV and +3EV (the more raw data, the better!). The reason for the bracketing was the very large dynamic range between the details in the stained glass and the shadows in the cloisters.

Due to the absurd number of tourists (this is a very popular location, and the left-hand leg points towards the very popular cafe), there were a few individual exposures which were repeated to include the tourist movement. In these particular shots, I then used Photoshop to layer the exposures and selectively mask out the tourists.

This resulted in 4 angles of bracketed, tourist-free shots.

I then put each bracketed angle into Aurora 2018, which yielded remarkable results. So good, I didn’t need to resort to luminosity masking in Photoshop.

This yielded 4 images from which to construct the panorama.

To my surprise (and gratification), finally Lightroom made an excellent job of stitching these four images together.

Equipment

Camera: Nikon D7500
Lens: Tokina 11-20mm f/2.8
Tripod: Gitzo 2545T Series 2 Traveller
Head: Gitzo GH1382QD Series 1 Centre Ball Head
Koolehaoda Panoramic Head
Hoage 140mm Nodal slide
Nikon cable release

Capture information

ISO: 100
Focal length: 11mm (16mm @ 35mm equivalent)
Exposure setting: Aperture priority
Aperture set: f/22
Resulting shutter speeds: 0.7sec to 30sec

Total number of source shots: 26

Software

Adobe Lightroom Classic CC
Adobe Photoshop
Aurora 2018

About me

I’m now a 63 year old retiree, though how I ever found time to work, I’ll never know. I’ve always been interested in photography, starting out with SLRs (non-digital, of course) in the 1970s. Since 1990, though, it all lapsed due to other pressures and interests, confining me to the usual point-and-shoot pocket camera and latterly, phones.

It was only in August 2017, when I finally had retired fully, that I started to get “serious” about it again, hence the purchase of some mid-range equipment and a whole load of internet-based learning.

I’m a very keen choral singer, being a member of the Bournemouth Symphony Chorus and the Philharmonia Chorus (London), but often do ad-hoc visits to various places for choral events. It was on one of these, in 2017, that I had reason to visit Gloucester Cathedral. Needless to say, I was blown away by the Cloisters, also being a Harry Potter fan. So, when I took up photography again some months later, I had it in mind to go back there and try to do justice to the incredible atmosphere, spirituality and workmanship of the place.

So, on a lovely, but cold, day in January 2018, I turned up there, paid my photographer’s fee and thoroughly “did” the place! The stats above are only for the image in question. In reality, I did four complete “sweeps” of the cloister panorama, totalling something like 80 shots, taking something like an hour and a quarter to capture. I was seated in a cloister adjacent to the south-west entrance and boy, was my bum cold by the time I’d finished!

In the short time since I have been taking photography seriously, I seem to have settled on two themes: Landscape and Historical buildings, particularly churches or cathedrals. I’m not particularly religious, but I do find that spending time in a sacred building makes me feel a real sense of connection with the amazing people who created these masterpieces. Although not as technically sophisticated as we now see ourselves, every one of these amazing artisans was a real person who lived, loved, suffered and lost, just as we do today. I consider myself honoured to be able to share their amazing talent with people everywhere.

Categories
Take better photos

A judge’s eye

Our judge Andy Chopping reflects on the 2017 shortlist and offers some tips for this year’s contestants.

September is upon us, heralding the start of the Wiki Loves Monuments photography competition. And I’m delighted to have been asked once again to help judge this excellent competition, which last year saw a remarkable 14,000 entries from across the UK.

I thought that this year’s entrants might benefit from some constructive ideas based on the 200 shortlisted photographs that we were asked to judge last year and why the 10 finalists succeeded in capturing a judge’s eye.

So, what makes a great Wiki Loves Monuments photo?

In no particular order I’d suggest that subject, viewpoint, composition, lighting and focus are all key elements.

Subject

Well, monuments obviously. But consider the vast number of visitors who have photographed England’s well-known castles, cathedrals and stately homes. You can be fairly certain that we will receive hundreds of thoroughly competent images rehashing the same old subjects. Might your efforts be better used in photographing something less mainstream? Given my interest in archaeology I was surprised to find that of last years 200 shortlisted images only 3 captured the monuments which were built by our early pre-Roman ancestors. And equally delighted that this one made the top ten:

Avebury henge and stone circles, by Paul Adams
Commended 2017: Avebury henge and stone circles, by Paul Adams, Wikimedia Commons CC BY-SA 4.0

Last year’s shortlist also surprised me with its paucity of photographs showing building interiors. Less than 15% of the entrants attempted to cover this area, and only one made the final cut. So the key to finding something new, and possibly success in the 2018 competition, might be as simple as moving indoors!

East Building Of Central Market, London, by Stevekeiretsu
Commended 2017: East Building Of Central Market, London, by Stevekeiretsu, Wikimedia Commons CC BY-SA 4.0

Viewpoint

Try to avoid the classic ‘postcard views’; no matter how perfect your image might be it will struggle to make an impression if it’s one of several dozen almost identical photographs. A great many of our monuments are so well known and so heavily photographed that even if we haven’t been to, say, Salisbury Cathedral/the Clifton Suspension Bridge/Stonehenge we will already be so familiar with the monument that we already know the viewpoints that by public consensus are reckoned to be the best.

And this is where the challenge lies. Walk around the monument, look at it through fresh eyes and find a viewpoint that avoids the ordinary and illustrates the monument in a way that others will not find so familiar, and will ideally never have experienced. Last year’s entries included a number of photographs made by photographers who had certainly found new viewpoints, working with UAV or ‘Drone’ camera platforms. Sadly none of these aerial images made the final cut. This year might be different. I know from my professional life that, used well (and legally), this technology can be a tremendous asset, but it’s essential to remember that it’s not enough to have an unusual viewpoint. Composition and lighting are also key to success.

Perch Rock Lighthouse, by Mark Warren 1973
Commended 2017: Perch Rock Lighthouse, by Mark Warren 1973, Wikimedia Commons CC BY-SA 4.0

Composition

Once you’ve selected the viewpoint for your photograph you’ll start the process of composing the image, finding the ideal way to frame the subject. The use of a tripod will help enormously, not simply by providing a stable base but more importantly by slowing down your actions and giving you time to consider fine adjustments.

Be aware of the classic guidelines of composition: rule of thirds, leading lines, and use of symmetry. But also keep enough background in the image to convey a sense of space and set the monument in context. Not only will the additional space give greater presence to the subject, it will also make the image more ‘useable’ and potentially more successful than the same view and moment tightly cropped.

Consider the use of human scale in your images. Less than 10% of last year’s shortlisted submissions featured people and in only 2 of those did their inclusion appear to have been deliberate. It’s undoubtedly true that a bus full of tourists can ruin an image, but one or two well-placed people can provide an added focal point for your shot, introduce a sense of scale and create a more engaging image overall.

De La Warr Pavilion, by Oliver Tookey
3rd prize 2017: De La Warr Pavilion, by Oliver Tookey, Wikimedia Commons CC BY-SA 4.0

Lighting

Lighting is almost everything in an image. Walk around your subject and predict how it might look at different times of the day or night. Consider the movement of daylight across your subject and try to plan the ideal hour to make your photograph.

Try to avoid harsh midday sun and exploit the golden hour. Light in the morning and early evening is much better suited to photography – long shadows accentuate texture and detail and the light has a colour and quality that can lift atmospheric quality.

But that being said, don’t be afraid of bad weather. People do their best to avoid wind, rain, sleet and snow. And as a result there’s a lack of photos of monuments in these conditions which immediately sets such images apart from the rest. The 2017 shortlist had only 4 images made in poor weather and 2 of them made it into the final 10.

Spectacular, or subtle and atmospheric lighting is sometimes encountered by accident, but more often by planning and effort. British weather is fickle and many attempts might be required before you find perfect moment to make your photograph.

Martello tower at Felixstowe Ferry, Suffolk, by Tony Lockhart
Commended 2017: Martello tower at Felixstowe Ferry, Suffolk, by Tony Lockhart, Wikimedia Commons CC BY-SA 4.0

Focus

If your camera allows it use selective focus to draw the observer’s eye into the frame, don’t simply let the camera determine what’s important. Selective depth of field can concentrate the observer’s attention where you want it, and can throw unwanted visual clutter into a soft un-distracting fore- or background. If appropriate, consider the use of long exposure to add a sense of movement to your image. Trees, clouds, flags, running water all lend themselves to this technique – but make your intentions apparent, there’s a world of difference between the apparently clumsy slight blurriness of water on the seashore and the mercurial silk like quality of a waves captured by a tripod-mounted long exposure.

The Derelict West Pier at Brighton, by Mathew Hoser
1st prize 2017: The Derelict West Pier at Brighton, by Mathew Hoser, Wikimedia Commons CC BY-SA 4.0

Finally …

If possible work with a tripod-mounted camera. Work slowly and make fewer, better images.

Try to see ‘the whole picture’. Many potentially great images don’t make the cut because they were ruined by a fleeting cloud shadow, or an unintended passer-by.

Shoot raw if possible and certainly use the tools available in your preferred processing program. But don’t overdo it; use your skills to finesse a good image, not to rescue a poor one.

Be critical of your own work; avoid at all costs submitting several slightly different versions of the same image; you might leave one stand-out image swamped by your apparent lack of confidence.

Your image should evoke an emotional response which demands more than a cursory glance. It should require a little work from the observer, drawing them into the frame, into a captured moment and place.

Ask yourself if your selected image will stand up to the ‘calendar test’… imagine it on your wall or desk for an entire month. When it’s time to turn the page a great photo still engages and entertains – will yours?

Categories
Take better photos

10 Tips for Architectural Photography

From our judge James O. Davies, Head of Photography at Historic England.

10 Tips for Architectural Photography

You’ll need to read James’s article to see the example images, but here are his tips, in brief:

1. Before taking a picture, walk all the way round the building, acquaint yourself with the site.

2. Decide exactly what you want to say about the building, what it is you want to communicate through the photograph.

3. Use the ambient light and time your photograph accordingly. Watch how a building responds by the way light changes from dawn till nightfall.

4. Try to keep the composition simple. Try not to over complicate the frame. Remove unwanted clutter and remove superfluous items.

5. Look for even illumination across an elevation and beware the elevation that’s half in shadow. Try to shoot either early morning or late evening when the the light is more sympathetic.

6. If shooting whole elevations, don’t truncate the building, step back, use space and let the building breathe.

7. Photographs don’t always have to taken from eye level, look for elevation, this will give a better sense of proportion.

8. Keep looking. Your initial ideas and viewpoint may well encompass everything you want to say, but don’t rely on it. By changing position and watching how the light changes other shots may present themselves.

9. Be persistent. Successful photographs take time, so slow down and never rush a photograph. If the conditions are against you don’t succumb to the act of taking the image, return the next day, the next week; the building and architect deserve the best.

10. Shoot RAW files, use a prime aperture, use a tripod and endeavour to keep verticals true. Use your eyes and feet to compose the image before setting up the camera.

© James O. Davies 2015

Categories
Experiences Take better photos

Special photos and Open House

Royal Albert Hall – Central View 169” by Colin is licensed CC BY-SA 4.0.

The Royal Albert Hall is best known for hosting the “BBC Proms”, a summer festival of classical music concerts. Opened in 1871, it stands 83m wide by 72m deep and 41m high, with capacity for over 5000 guests. As fitting for Victorian Britain, the hall is ornately decorated, with red and gold the dominant colours. The fibreglass acoustic diffusing discs, normally beige, are here coloured by violet LED lights.

The building is only open to the public when attending a concert or on a guided tour, neither of which afford the time or opportunity to take high quality photographs. Fortunately, the RAH takes part in Open House London, an annual architecture festival where over 800 buildings are opened for free to the public over one weekend in September.

As a photographer in London, Open House is one of my favourite weekends of the year. The focus of the event is architecture, both modern and historical. Some buildings have extremely limited access, with a ballot run to award tickets. For example, access to 10 Downing Street or going up the BT Tower, but this also includes many small places that could not handle large crowds such as private residences. Other buildings are extremely popular, with huge queues to access. The Gherkin (30 St Mary Axe) is a prime example, as it can only handle 30 visitors at a time. Many though are more reasonable in terms of queues and volume of guests.

I decided to visit the Royal Albert Hall on Open House Saturday last year and joined the relatively short queue to enter at 9:30. Guests were guided round a set route which took in most areas of the building, including access to selected areas of seating on most levels. Photographically, this was a big advantage as the downside to Open House is that fellow visitors crowd in front of the camera, providing not only a distraction to the eye but also making long-exposure photography very tricky. Here, though, it was possible to photograph the hall without visitors appearing in the frame.

The image above is not a single photograph, but is stitched together from 21 frames. In fact, I took around 40 frames that cover a wide and tall area, and this is just a crop of the full stitched image. In order that the frames align correctly without parallax errors, one needs to use a special panoramic head on top of a tripod. This equipment ensures the camera rotates around the “entrance pupil” of the lens, which is where the light rays cross before being focused onto the sensor. The frames are stitched together on a computer, using a software package called PtGui.

One problem with photographing interiors is the extremes of brightness from the dark corners to the bright lights or windows. This is too much for a single photograph to handle with current technology. To get round this, I took three photographs for each frame, at 1/3s, 1.3s and 5s. These three exposures are combined by PtGui to produce a High Dynamic Range (HDR) image. This is then converted back to a standard JPG file with Photoshop Lightroom, using a technique called tonemapping.

The result is an image with far higher resolution, much lower noise, and better lighting control than could be achieved with even the most expensive camera in a single shot. It is time-consuming both to take and to develop afterwards, but this effort paid off with second prize in last year’s Wiki Loves Monuments international awards.

Categories
Take better photos

Common errors – camera handling

Please try to avoid these common errors, as they make your photographs much less useful.

Click on the right of the main image to step through the errors.

Categories
Take better photos

Common errors – auto settings

Please try to avoid these common errors, as they make your photographs much less useful.

Click on the right of the main image to step through the errors.

Categories
Take better photos

Common errors – subjects

Please try to avoid these common errors, as they make your photographs much less useful.

Click on the right of the main image to step through the errors.